As social media becomes more prevalent in the business world, more people and organizations are taking the “Twitter plunge.” But many aren’t sure how to create a Twitter account.
Don’t worry, you can be addicted in just a few minutes with this how-to guide for setting up your first Twitter account.
How to Create A Twitter Account
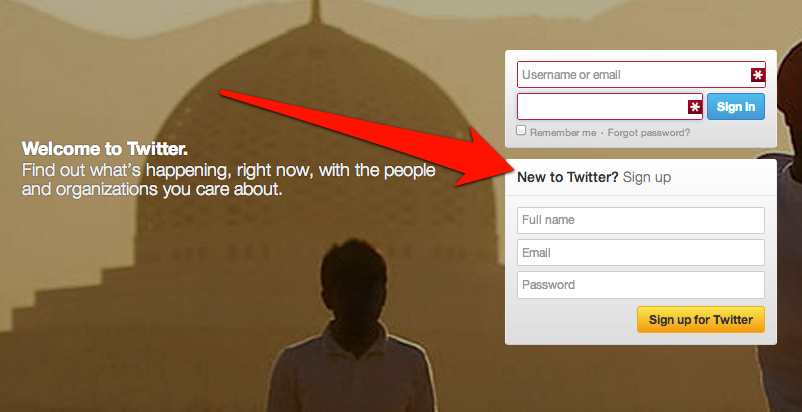
Go to Twitter.com and click the “Sign up for Twitter” button on the right side of the page.
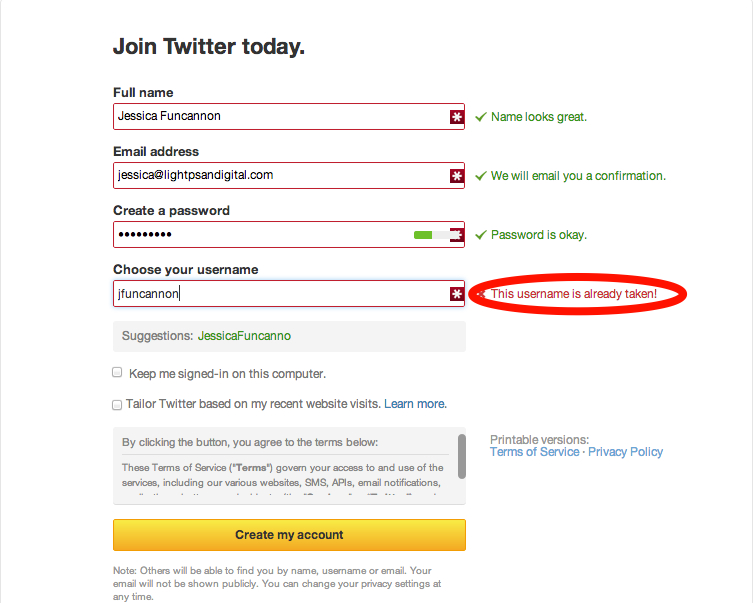
This will lead you to a page where you insert personal information to create your Twitter account. Insert your full name, email address and password. You will then be prompted to create a username, or Twittter handle.
It may take a few attempts to find a username that isn’t already taken. However, Twitter will offer you a few suggestions to make the task a little easier. Try to choose a handle that’s easy for others to remember, and keep it as short as makes sense.
Once you’re ready, hit the yellow “create my account” button at the bottom of the page.
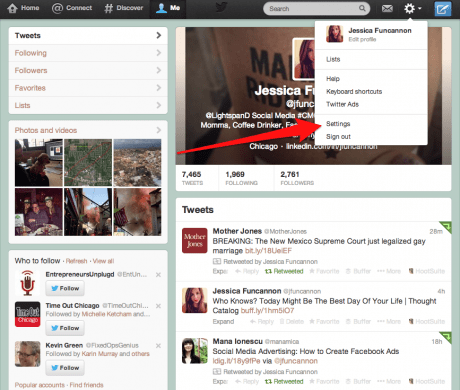
Twitter will then direct you through the basic steps. You will then end up on your Twitter home page. Here you’ll notice that your home page will look a little different than mine because my account has already been what I like to call “pretty-tized.”
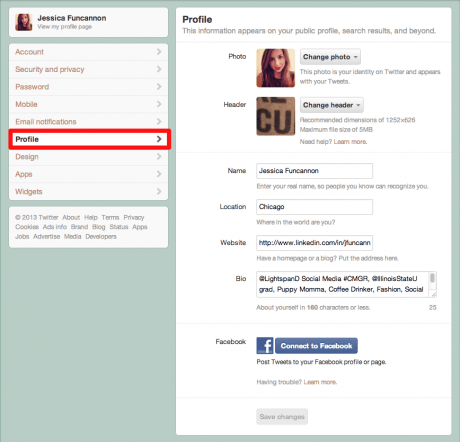
I changed my background color, uploaded a profile image and also inserted a bio (a short description of myself). Although you do not have to change your background color, we do recommend uploading a photo and editing your bio so that your account does not look like a fake or spam account. To change these settings and more, click the “settings” button as shown below.
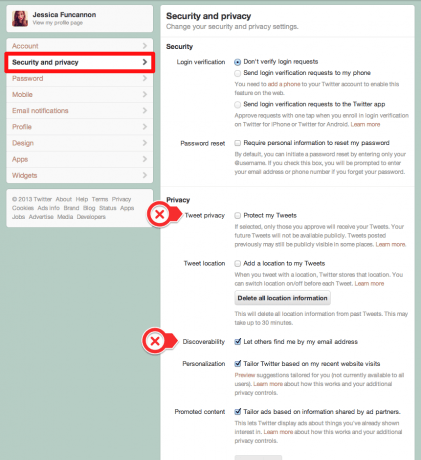
Under “security and privacy” tab in settings you’ll see all of your privacy and account settings. Change these as you see fit for your personal or professional use. The “Protect my Tweets” setting means that only users you allow to follow you can see your posts. Some people use this to keep their Twitter presence at a personal level, just like many do with their Facebook accounts.
If you’re not sure how public you want to be on Twitter yet, see our post on How to Be Social Without Saying A Word.
Under the “profile” section of settings you’ll see where you are able to upload your profile and header images as well as update your bio. Under “design” you can be as creative as you’d like with your background colors!
Now you know how to create a Twitter account. How do you use it from here? You’ll have to come back to read this blog for those tricks!
BONUS! Here are some of my favorite apps that I use in conjunction with my personal Twitter account:
Professional:
- Storify: Allows you to make stories with social media
- Vine: This can be used personally or professionally; Vine shares your life in motion. Capture a moment in six seconds or less.
- Buffer: Found a great article? Easily share it via this app and have it schedule itself throughout the day/week.
- Livefyre: If you comment on blogs and articles often, why not do so with a link to your Twitter account?
- ManageFlitter: Easily clean up your account by unfollowing people that are no longer active and spammy!
- Instagram: Share your photos in a beautiful and fun way!
For Fun:
- Timehop: Shuffles through your past tweets to answer the question, “What were you doing a year ago today?”
- Twitter for iPad: I ♥ my iPad and this app allows me to stay connected!
- Pinterest: If I find something I love on Pinterest, I can easily share it to my Twitter account.
- Klout: I list this under “for fun” because I personally don’t believe that Klout is a 100% accurate measure of social influence. BUT, that being said, I love my Perks!
Hopefully this helps get you going with your first Twitter account. Happy tweeting! 🙂

Leave a Reply