If you’re in tune with your website’s Google Analytics, you might be wondering why one of your top traffic sources is not provided. This is because many people have opted to block their web browsers from being captured. This is one reason why Google Analytics URL Builder can be useful- to help you capture otherwise missing data. The URL builder helps to gain more in-depth insight as to where your website traffic is coming from.
1. Check out the Google Analytics URL Builder website.
This is the basic page where you can go and manually create a custom campaign URL. If you don’t plan on using the URL builder often, this is an effective means of getting the information you want. But, I recommend to…
2. Download the Chrome add-on.
I use this option because it’s an easy one-click step and you can access saved quick sets. More about quick sets next.
3. Add quick sets to make your life much easier.
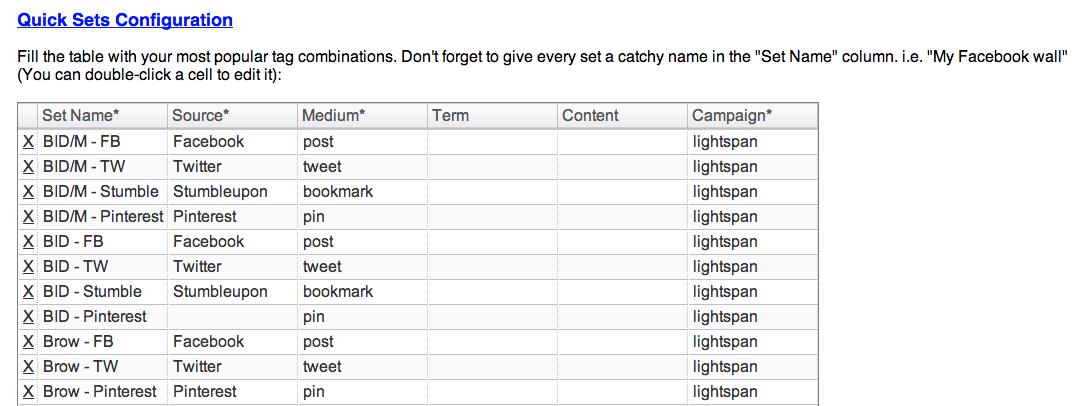
Once the Google Analytics URL Builder is downloaded, click on that to reveal the entire menu of options. You can either fill out the form manually each time or you can use quick sets. Quick sets are definitely the way to go. Click “edit list” and it will lead you to this screen.
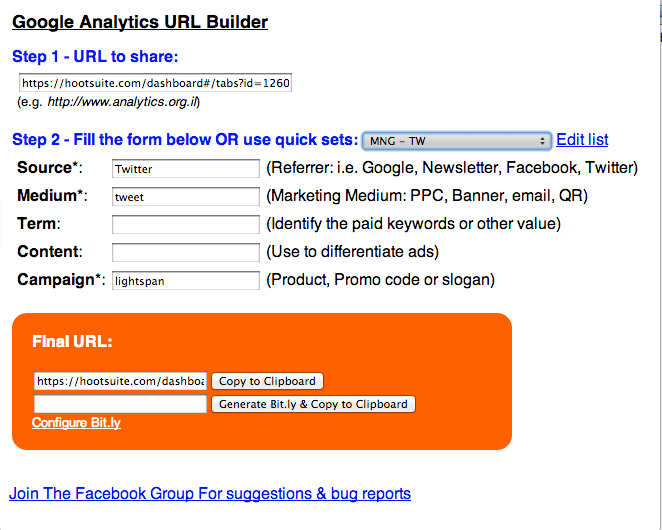
Google Analytics URL Builder asks for three required fields: source, medium and campaign. These are the only three I use for myself and my clients.
- Source– The source of traffic (example: Facebook, newsletter, etc.)
- Medium– How is the message being carried? If you are using Facebook then the medium would be a post. Twitter- tweet, newsletter, email and so forth.
- Campaign– For Lightspan, I always insert “lightspan” in this section to show that this traffic is from something that I have done. But, this could be used for more specific purposes. You sent out an email newsletter last week so write “Newsletter 10/1/12.” Easy as that!
As you can see, I have several different sets that I use personally and for my clients. Having these all organized into quick sets makes it much easier to grab and share things!
4. Share with the world!
Once you have the link you want to share and have chosen the appropriate quick set, your designated information will show up in the blanks and your final URL will show up in the orange box. Notice that there is an option to shorten the link to be more shareable.
4. Check, check, check it out!
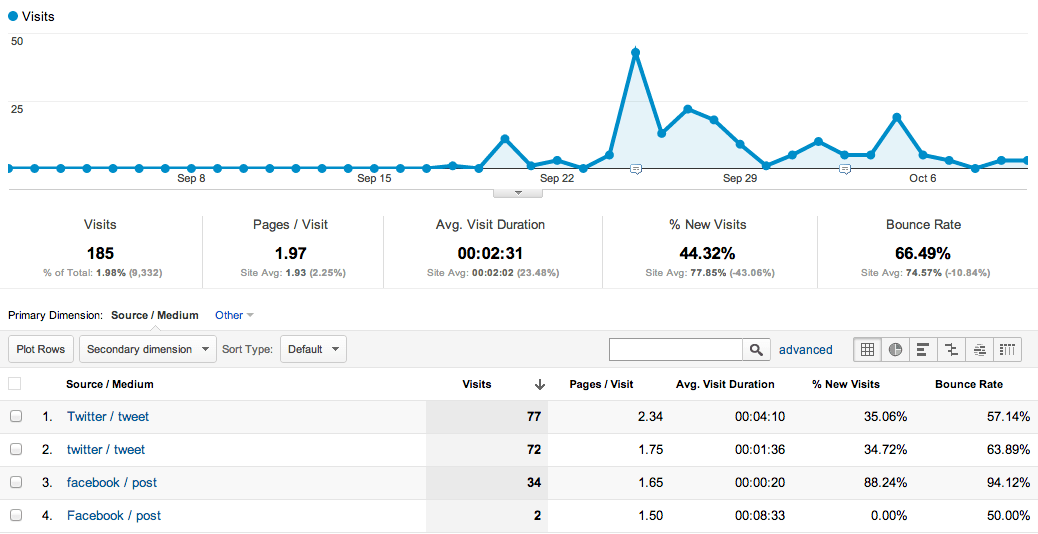
This is my favorite part. Once you have your customized URLs out in the world, you will start seeing this information in your Google Analytics under Traffic Sources > Sources > Campaigns. As you can tell in the screenshot below, the campaign “lightspan” captured otherwise unknown information. But you can dig even deeper!
By clicking the campaign name, you can get more relevant information about the sources and mediums. This is why these designated fields are all very important to fill in when you’re creating your sets.
This is just a brief overview of how I use the Google Analytics URL Builder in my daily work routine. Please leave comments below and let me know if this was helpful for you!


Leave a Reply